If you've been around in Chennai very long I am sure you have seen people carrying around bags such as theses:
But they have probably been bigger. You can make them in any size. I made the above for my nieces and nephews last Christmas so I made them more child sized. And now I am going to try and give a step by step on how you can make these yourself. The first thing you need to do is brave Parry's. Don't try driving there yourself, there is no parking and the streets get narrow in places. Best is to take an auto. For you to get close to the desired shops you want to ask for the Flower Bazaar Police Station. Once there you are have to get in and brave the crowded streets and get to the plastics and then simply pick your colors.
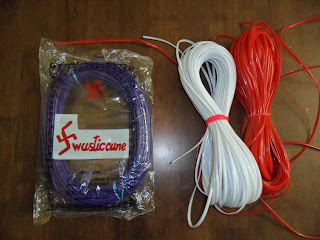
They will come in packs like you see below. The red and white are what I will be using. Price wise it ranges from INR 35-50 per package. So it's way cheap. One will make a small one, but you need about three to make a larger grocery sized bag. But that's way cheaper than the INR 800 that stores like to charge the expats. But you can buy the bags in Parry's as well. The shops that sell the plastic to make the bags usually have bags to sell as well. And as you might have guessed, at a much cheaper price than you will find at the fancy shops that cater to expats.
So the first thing you have to do once you have bought the plastic is design the bag. The traditional color scheme is to do a sort of plaid. So I am doing one similar to the one in right hand corner of the first picture. This is how I make my patterns. I used black for the white as white isn't really going to show up.
Then you need to cut the strands to make the base. For this smaller one I will need 7 strands at 73 inches and 15 strands that are 65 inches long.
Next you take what will be the middle strand for each side. You find the middle of each strand.
The longer strand is the one on the left. The shorter one goes around the longer one. (Starting to think I should have arranged it so they would be two different colors. Oh, well.)
Next you take the bottom of the longer one and put it over the shorter strand.
Then the bottom of the shorter one goes over then under.
Pull tight, but not overly so or it will come out poorly. Tension is important on this.
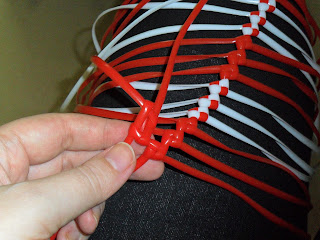
Then you find the middle of the next short one. (You will be putting all the shorter ones onto one longer one before adding the rest of the long ones.) And you will fold over the longer one as you see in the picture below.
And once again the shorter one (white) goes around the longer one (red).
The longer one (red) will fold over the top of the shorter one (white).
Then the bottom of the shorter strand (white) will go over then under (or through).
Pull tight, but once again, not too tight. As you are working from the middle out, after you put all the shorter ones from your
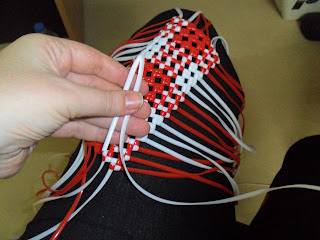
This is what it should like after you have added the short strands. Don't forget that as you are starting in the middle you will add the short strands from one side of the pattern, then you will need to turn it around and add the short strands to the other side.
Now you will begin to add the rest of the longer strands. To know where to begin, You will measure the new strand against the tail of the existing strand. Then make the fold a little further up the new strand.
As you will put the bag strand over where you want the new strand to start.
The bag strand will go around the new strand.
Then the bottom of the new strand will go over the bag strand.
The bag strand goes over and under (or through).
Pull tight.
And repeat by folding the new strand under.
Putting the bag strand around.
Then the bottom of the new strand goes over.
And the bag strand goes over then under (or through).
Pull tight.
This is what the base of your bag to look like after you have added all your strands. Ta-da, you have a base! Yay!
Adding on the sides: This you take from the rest of the roll, you do not cut this beforehand. You fold a small piece over like so.
Then you choose a corner and place the strand over what you are adding.
You are going to have it wrap around the new white strand.
Then you will take the bottom part of the white strand and fold it over the red.
The red goes over and under (or through).
You pull tight. And you repeat all around. You will work in continuous rounds. Going over the first stitch might be a little tough, but with a little pulling you'll be fine.
Before going too far, you will want to turn the bag over to weave in the end of the starting piece.
Simply slide the starting end through the loops.
To change colors what I did was put on five rows, then I stopped before my starting point leaving a little bit of a tail to weave in later.
Then you take the new color and start as you did in the beginning; folding a piece over.
Then wrap over the piece you are adding.
The bottom of the new strand goes over.
The bag strand goes over then under (or through). And pull tight and continue. You can change back again if you so desire.
But, as this bag is small, before you get too far you are going to want to weave in the ends (tails).
Just push them through the loops that the weaving creates. Be sure to weave them so as to close the hole the color change creates. So here I wove the red to the left and the white to the right.
Once your bag is the height you want, cut the plastic you were adding, once again leaving a tail to be woven in.
Weave this tail through the top loops like so.
Once that is done you will be weaving in these strands around the top.
First go around and push each strand through the third loop down.
This way all the strands are out of the way as you work.
Then you will weave each strand down three to four more loops, pulling it tight so the top row folds over.
Then you will have a bag that looks like this:
And I will show you handles in the next post. I will also see if I can do a video to better explain how to make the bag.
Good luck and have fun making a bag of your own. They are awesome for carrying everything. I use one for carrying groceries as it's sturdy and easy to clean. I have friends who use them as pool bags. Others have added a lining and used them as purses.
But they have probably been bigger. You can make them in any size. I made the above for my nieces and nephews last Christmas so I made them more child sized. And now I am going to try and give a step by step on how you can make these yourself. The first thing you need to do is brave Parry's. Don't try driving there yourself, there is no parking and the streets get narrow in places. Best is to take an auto. For you to get close to the desired shops you want to ask for the Flower Bazaar Police Station. Once there you are have to get in and brave the crowded streets and get to the plastics and then simply pick your colors.
They will come in packs like you see below. The red and white are what I will be using. Price wise it ranges from INR 35-50 per package. So it's way cheap. One will make a small one, but you need about three to make a larger grocery sized bag. But that's way cheaper than the INR 800 that stores like to charge the expats. But you can buy the bags in Parry's as well. The shops that sell the plastic to make the bags usually have bags to sell as well. And as you might have guessed, at a much cheaper price than you will find at the fancy shops that cater to expats.
So the first thing you have to do once you have bought the plastic is design the bag. The traditional color scheme is to do a sort of plaid. So I am doing one similar to the one in right hand corner of the first picture. This is how I make my patterns. I used black for the white as white isn't really going to show up.
Then you need to cut the strands to make the base. For this smaller one I will need 7 strands at 73 inches and 15 strands that are 65 inches long.
Next you take what will be the middle strand for each side. You find the middle of each strand.
The longer strand is the one on the left. The shorter one goes around the longer one. (Starting to think I should have arranged it so they would be two different colors. Oh, well.)
Next you take the bottom of the longer one and put it over the shorter strand.
Then the bottom of the shorter one goes over then under.
Pull tight, but not overly so or it will come out poorly. Tension is important on this.
Then you find the middle of the next short one. (You will be putting all the shorter ones onto one longer one before adding the rest of the long ones.) And you will fold over the longer one as you see in the picture below.
And once again the shorter one (white) goes around the longer one (red).
The longer one (red) will fold over the top of the shorter one (white).
Then the bottom of the shorter strand (white) will go over then under (or through).
Pull tight, but once again, not too tight. As you are working from the middle out, after you put all the shorter ones from your
This is what it should like after you have added the short strands. Don't forget that as you are starting in the middle you will add the short strands from one side of the pattern, then you will need to turn it around and add the short strands to the other side.
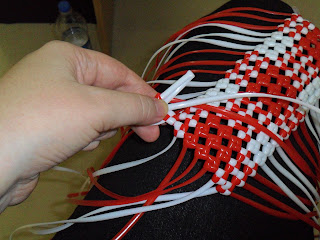
Now you will begin to add the rest of the longer strands. To know where to begin, You will measure the new strand against the tail of the existing strand. Then make the fold a little further up the new strand.
As you will put the bag strand over where you want the new strand to start.
The bag strand will go around the new strand.
Then the bottom of the new strand will go over the bag strand.
The bag strand goes over and under (or through).
Pull tight.
And repeat by folding the new strand under.
Putting the bag strand around.
Then the bottom of the new strand goes over.
And the bag strand goes over then under (or through).
Pull tight.
This is what the base of your bag to look like after you have added all your strands. Ta-da, you have a base! Yay!
Adding on the sides: This you take from the rest of the roll, you do not cut this beforehand. You fold a small piece over like so.
Then you choose a corner and place the strand over what you are adding.
You are going to have it wrap around the new white strand.
Then you will take the bottom part of the white strand and fold it over the red.
The red goes over and under (or through).
You pull tight. And you repeat all around. You will work in continuous rounds. Going over the first stitch might be a little tough, but with a little pulling you'll be fine.
Before going too far, you will want to turn the bag over to weave in the end of the starting piece.
Simply slide the starting end through the loops.
To change colors what I did was put on five rows, then I stopped before my starting point leaving a little bit of a tail to weave in later.
Then wrap over the piece you are adding.
The bottom of the new strand goes over.
The bag strand goes over then under (or through). And pull tight and continue. You can change back again if you so desire.
But, as this bag is small, before you get too far you are going to want to weave in the ends (tails).
Just push them through the loops that the weaving creates. Be sure to weave them so as to close the hole the color change creates. So here I wove the red to the left and the white to the right.
Once your bag is the height you want, cut the plastic you were adding, once again leaving a tail to be woven in.
Weave this tail through the top loops like so.
Once that is done you will be weaving in these strands around the top.
First go around and push each strand through the third loop down.
This way all the strands are out of the way as you work.
Then you will weave each strand down three to four more loops, pulling it tight so the top row folds over.
Once done you can clip off the ends.
Then you will have a bag that looks like this:
And I will show you handles in the next post. I will also see if I can do a video to better explain how to make the bag.
Good luck and have fun making a bag of your own. They are awesome for carrying everything. I use one for carrying groceries as it's sturdy and easy to clean. I have friends who use them as pool bags. Others have added a lining and used them as purses.


No comments:
Post a Comment